
Dubai chocolate cake
Table of Contents
Introduction: Dubai chocolate cake
If you’ve ever dreamed of a dessert that feels luxurious, comforting, and just a little bit dramatic (in the best Dubai way possible), then this Dubai chocolate cake recipe is your new favorite obsession. Picture an ultra-indulgent chocolate cake bursting with deep cocoa notes, smooth melted chocolate, and a refined Middle Eastern flair inspired by the finest Dubai bakeries. Whether you love dark chocolate, prefer something softer like milk chocolate, or secretly adore pistachio-studded chocolate desserts, this cake welcomes you with open arms…and extra ganache.
I love that this recipe feels like a celebration even when you bake it “just because.” It is indulgent without being complicated, luxurious but still totally doable in a home kitchen. Have you ever tasted a cake so good you wanted to pause time for a moment? That is the goal here. And yes, you may find yourself proudly saying, “I baked this” with a little victory smile.
So grab your whisk, warm up that chocolate, and get ready to create a chocolate dessert that feels like a sweet trip to Dubai—without leaving your kitchen. Ready to bake something unforgettable? Let’s do it.
Why Choose This Dubai Chocolate Cake Recipe
If you love desserts that taste like pure luxury but are still easy to prepare at home, this Dubai chocolate cake recipe is exactly what you need. It combines deep cocoa richness, silky melted chocolate, and that signature Dubai flair that turns a simple dessert into a show-stopping chocolate cake experience. This is not just another chocolate cake recipe—it is the kind of cake that makes guests pause after the first bite and say, “Wow… what did you put in this?”
Here’s why this recipe stands out
- Ultra-moist texture: The combination of cocoa and melted chocolate ensures deep flavor and softness in every slice.
- Luxury bakery flavor at home: Inspired by premium Dubai chocolate desserts, it delivers elegance without complicated techniques.
- Beginner-friendly but impressive: Clear steps and forgiving ingredients make success simple, even if you’re not a pastry expert.
- Flexible & customizable: From pistachio accents to rich ganache, you can adapt this chocolate dessert to suit your taste.
- Perfect for any occasion: Birthdays, celebrations, dinner parties—or just a well-deserved moment of chocolate happiness.
Who will love this cake?
- Anyone craving a dark chocolate, milk chocolate, or rich cocoa-based dessert
- Home bakers who want the best chocolate cake without stress
- Chocolate lovers who appreciate bold flavor and soft, melt-in-the-mouth texture
This Dubai-inspired cake proves that “fancy” doesn’t have to mean complicated. With the right ingredients, a little patience, and the right guidance, you can bake a cake that tastes like it came straight from a luxury pastry counter—only warmer, fresher, and proudly homemade.
Here’s a well-structured Recipe Summary Table for your Dubai Chocolate Cake Recipe, designed to be visually appealing, user-friendly, and SEO-optimized. I’ve included icons for a professional blog-style presentation:
Recipe Summary: Dubai Chocolate Cake
| 🍫 Recipe Details | Information |
| ⏱ Preparation Time | 20 minutes |
| 🔥 Cooking Time | 30–35 minutes |
| ⏲ Total Time | 50–55 minutes |
| 🍰 Portions | 8–10 servings |
| ⚡ Calories | ~450 kcal per slice |
| 🍴 Categorize Recipe | Information |
| 🥄 Course | Dessert / Chocolate Cake |
| 👩🍳 Cooking | Baking |
| 🌟 Difficulty | Easy to Intermediate |
| 🌍 Cuisine | Dubai / Middle Eastern Inspired |
| 🏆 Skill Level | Beginner to Home Baker |
Key Notes:
- Perfect for chocolate dessert lovers, birthday celebrations, or special occasions.
- Can be adapted into mini cupcakes, pistachio layers, or chocolate ganache toppings.
- Ideal for creating a luxurious, bakery-style dessert at home without complicated techniques.
Focus on Ingredients & Equipment Required
Before we dive into baking, let’s set the stage for success. A great Dubai chocolate cake recipe starts with quality ingredients, the right balance of flavors, and a few simple tools you probably already have in your kitchen. Think of this step as your chocolate “mise en place”—organized, stress-free, and deliciously promising.
Essential Ingredients for the Best Results
Each ingredient plays a role in creating that ultra-moist, luxurious chocolate cake texture Dubai desserts are famous for. Here is what you will need:
Dry Ingredients
- 1 ¾ cups all-purpose flour – for soft structure
- ¾ cup unsweetened cocoa powder – deep chocolate flavor
- 1 ½ tsp baking powder
- 1 ½ tsp baking soda
- A small pinch of salt to boost the sweetness and bring the flavors into perfect balance.
Wet Ingredients
- 2 large eggs – richness and stability
- 1 cup white sugar + ½ cup brown sugar – moisture + flavor depth
- 1 cup milk – keeps the cake tender
- ½ cup of melted dark chocolate, adding a luxurious richness inspired by Dubai-style desserts.
- ½ cup vegetable oil – guarantees softness
- 1 cup hot coffee – intensifies chocolate taste
- 2 tsp vanilla extract – warmth and aroma
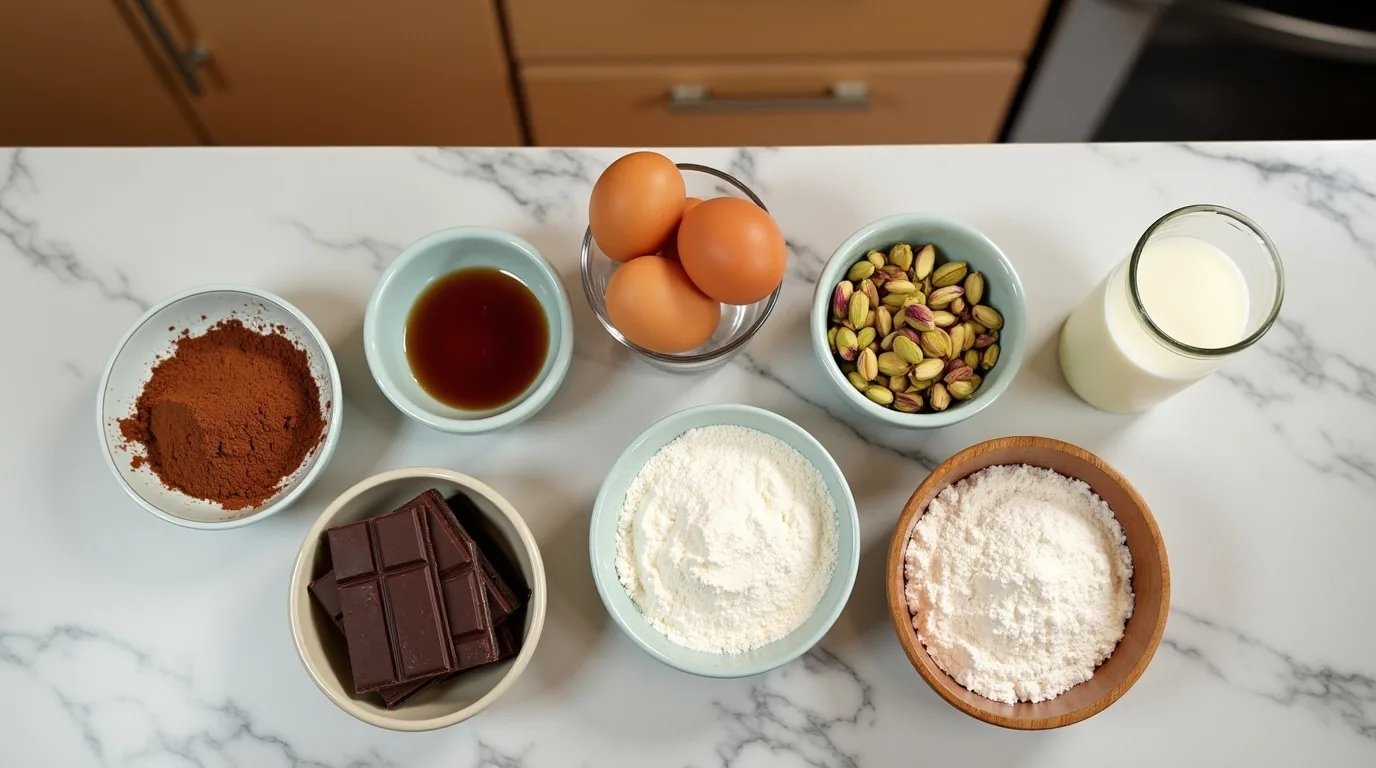
Optional Dubai Signature Touch
Want to take your chocolate dessert to “golden city” level?
- Crushed pistachios
- Pistachio cream layer
- Thick chocolate ganache
- Extra dark or milk chocolate chunks
These additions bring that unique Dubai personality to your homemade chocolate cake recipe.
Equipment You’ll Need
Nothing complicated. Just simple, practical tools:
- Mixing bowls
- Whisk or electric mixer
- Measuring cups and spoons
- Cake pan (round or square)
- Spatula
- Cooling rack
When your ingredients are measured, your tools are ready, and your chocolate is waiting to shine, you’re already halfway to success. This organized start ensures your chocolate cake turns out smooth, flavorful, and wonderfully indulgent—just like a true Dubai bakery treat.
Preparation Steps in Detail
Step 1 – Preheat and Prepare the Pan:
Start by preheating your oven to 350°F (175°C). This step is essential because a properly heated oven helps your Dubai chocolate cake rise evenly and develop that beautiful soft crumb we all love. While the oven warms up, grease your cake pan generously with butter or oil, then line the base with parchment paper. This small detail prevents sticking and guarantees a smooth, professional-looking finish when you unmold the cake.
Step 2 – Mix the Dry Ingredients:
In a large bowl, sift together the flour, cocoa powder, baking powder, baking soda, and a pinch of salt. Sifting is not just a fancy extra step—it breaks up clumps, incorporates air, and ensures all your leavening agents are evenly distributed, which results in a lighter, fluffier chocolate cake with balanced flavor.
Step 3 – Prepare the Wet Mixture:
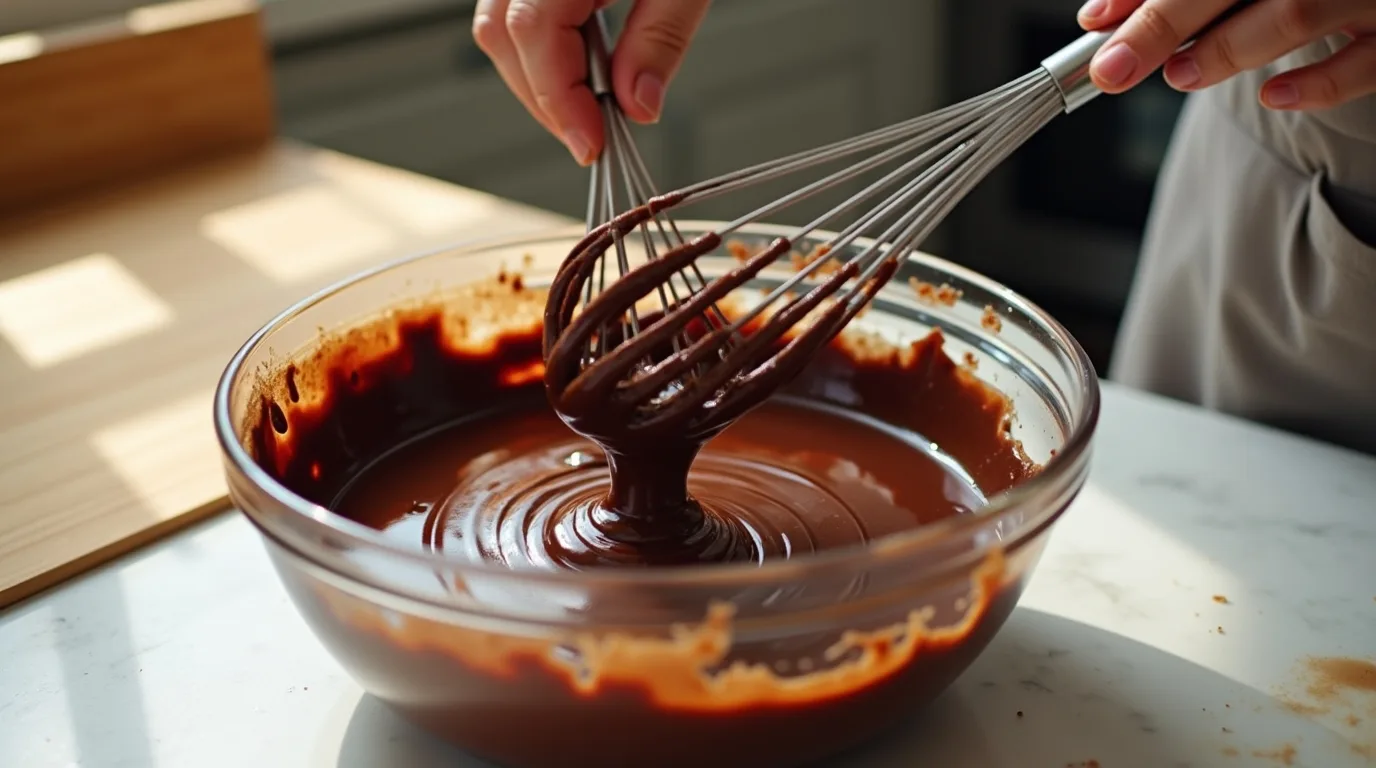
In a separate bowl, whisk the eggs with white sugar and brown sugar until the mixture becomes pale and slightly thick. The brown sugar adds moisture and a delicate caramel note, enhancing the richness. Slowly add the oil, milk, vanilla extract, and melted chocolate, whisking until everything blends into a smooth, glossy mixture. This creates the deliciously indulgent base of your chocolate cake batter.
Step 4 – Combine Wet and Dry:
Gently pour the dry ingredients into the wet mixture in two or three additions. Use a spatula or whisk to fold everything together slowly. Avoid overmixing; you just want the flour to disappear into the batter. Overmixing develops gluten and can make your cake dense instead of tender and moist.
Step 5 – Intensify the Chocolate Flavor:
Now comes the magic touch often found in luxurious Dubai chocolate desserts. Pour in hot coffee or hot water and stir gently. The heat helps deepen the cocoa flavor, giving your cake a richer, more intense chocolate taste. Don’t worry—you won’t taste the coffee, only richer chocolate goodness.
Step 6 – Bake to Perfection:
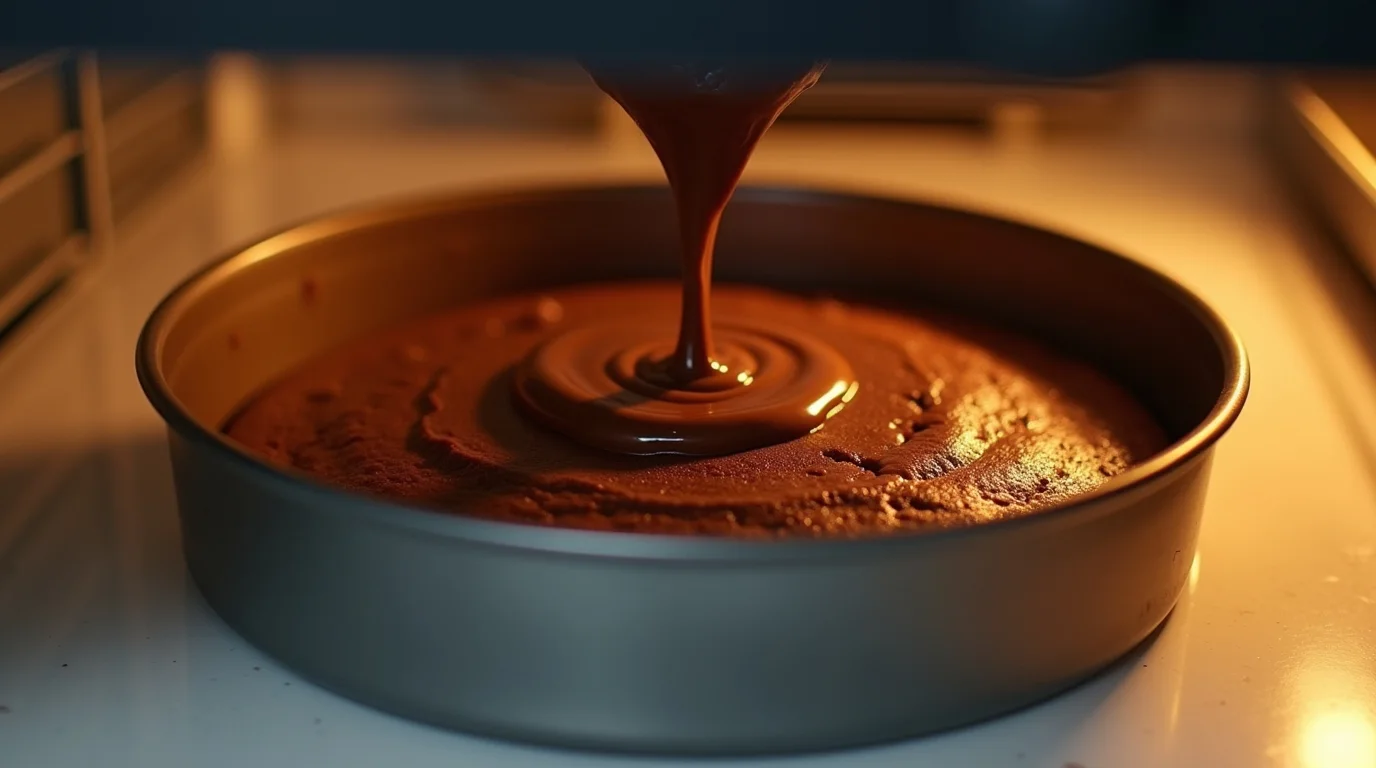
Pour the silky batter into your prepared cake pan, smoothing the top so it bakes evenly. Place it in the center of the oven and bake for 30–35 minutes. You’ll know it is ready when a toothpick inserted into the center comes out clean or with a few moist crumbs. The kitchen will already smell like pure chocolate heaven.
Step 7 – Cooling and Setting:
Remove the cake from the oven and let it rest in the pan for about 10 minutes. This allows the structure to stabilize and prevents breaking. Then carefully transfer it to a cooling rack to cool completely before frosting, glazing, or decorating.
With patience, precision, and just a little love, you will achieve a beautifully moist, rich, and luxurious Dubai chocolate cake that tastes like it came straight from a premium bakery—yet feels wonderfully homemade.
ChocoChefAI Tip: Mastering the Dubai Chocolate Cake
Here’s where I share my insider ChocoChefAI tips to make your Dubai chocolate cake recipe truly stand out. Simple techniques and careful choices can transform a good chocolate cake into a refined dessert you’ll be truly proud to present.
1. Use quality chocolate:
Always choose real dark chocolate or high-grade cocoa for that rich, melt-in-your-mouth flavor. For a lighter twist, a combination of milk chocolate and cocoa can create a softer, sweeter profile.
2. Perfect the batter:
When combining wet and dry ingredients, fold gently. Overmixing can make your cake dense, while careful mixing ensures a soft, fluffy crumb reminiscent of bakery-style Dubai chocolate desserts.
3. Boost the flavor:
Adding a small amount of hot coffee or espresso to your batter doesn’t make the cake taste like coffee—it enhances the chocolate depth, giving your cake that signature bold, luxurious taste.
4. Temperature matters:
Let your eggs, milk, and butter reach room temperature before mixing. Ingredients at similar temperatures combine more smoothly, preventing grainy texture and improving overall consistency.
5. Cooling is crucial:
After baking, allow your cake to cool completely on a wire rack before frosting or slicing. This prevents your ganache or pistachio layer from melting and ensures each slice holds its shape perfectly.
6. Creative toppings:
Pistachio cream, chopped nuts, chocolate shavings, or a drizzle of chocolate ganache can elevate the cake visually and flavor-wise. Even simple dustings of cocoa or powdered sugar add elegance.
7. Confidence matters:
Baking is as much about technique as it is about enjoyment. Trust the process, follow your instincts, and remember—every small adjustment teaches you how to master Dubai chocolate cake in your own kitchen.
With these ChocoChefAI tips, your chocolate cake will have the rich flavor, moist texture, and irresistible allure of a premium Dubai dessert—without ever leaving your home.
Creative Variations: Make Your Dubai Chocolate Cake Unforgettable
Once you’ve mastered the base Dubai chocolate cake recipe, the fun really begins. This cake is a versatile canvas that invites creativity. With a few simple tweaks, you can create luxurious twists, add personal flair, or even turn it into multiple desserts—all while keeping that rich, bakery-style chocolate flavor.
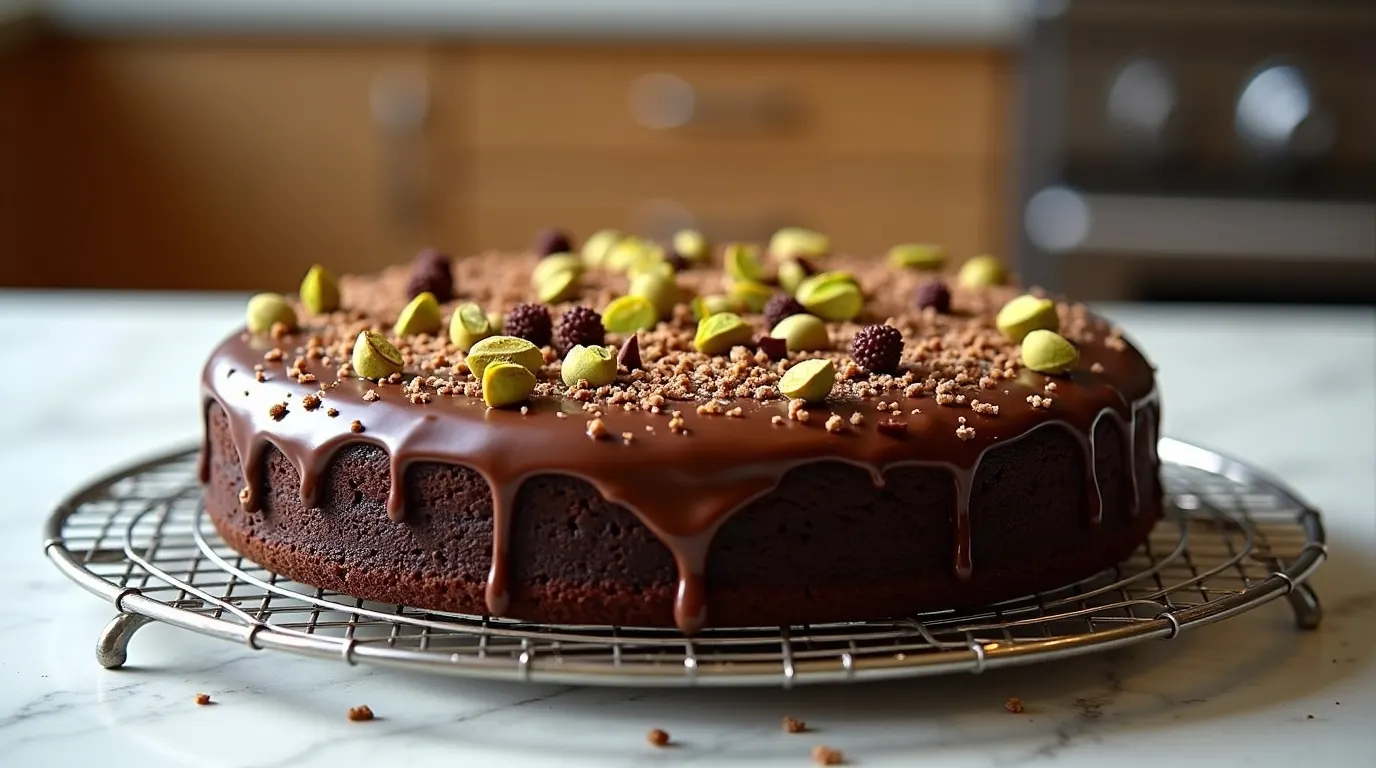
1. Pistachio Chocolate Cake:
Add a layer of pistachio cream between cake layers or sprinkle chopped pistachios on top. The nutty flavor pairs beautifully with dark chocolate, giving your dessert a Middle Eastern-inspired elegance.
2. Double Chocolate Indulgence:
For true chocolate lovers, fold in chocolate chips or chunks to the batter. This creates pockets of melted chocolate in every bite and makes your chocolate dessert extra decadent.
3. Chocolate Ganache Glaze:
Top the cooled cake with a glossy chocolate ganache for a professional finish. This not only intensifies the chocolate flavor but also gives the cake a luxurious look that impresses at parties or special occasions.
4. Mini Cake or Cupcakes Version:
Turn the batter into mini cakes or cupcakes for individual servings. Use mini cupcake liners and a mini cupcake pan to bake perfectly portioned bites. They’re perfect for celebrations, gifting, or just sharing with friends.
5. Flavor Infusions:
Experiment with subtle flavors like orange zest, a dash of cinnamon, or a teaspoon of espresso powder. These small additions enhance the chocolate depth without overpowering it, creating a more complex and memorable dessert.
6. Dubai Chocolate Bar Inspiration:
If you want to replicate the luxury of a Dubai chocolate bar, top your cake with a thin layer of dark chocolate and a sprinkling of edible gold dust, pistachios, or crushed nuts. This transforms your homemade cake into a statement dessert.
These creative variations are perfect for experimenting while keeping the chocolate cake rich, moist, and indulgent. Whether you’re aiming for a simple, classic cake or a show-stopping centerpiece, these tweaks ensure every slice feels special and uniquely yours.
Conservation and Reuse: Keep Your Dubai Chocolate Cake Fresh
Now that your Dubai chocolate cake is baked to perfection, it’s important to know how to store it properly so every bite stays moist, flavorful, and irresistible. Proper storage also allows you to enjoy your dessert over several days or even repurpose it into new treats—maximizing every slice of your effort.
Storing Your Cake:
- Room temperature: Once cooled completely, cover your cake with a cake dome or airtight container. It will stay fresh for 2–3 days, keeping the crumb soft and the chocolate rich.
- Refrigeration: For longer storage, wrap the cake in plastic wrap and place it in an airtight container. Refrigerated, it will last up to 5 days. Bring it to room temperature before serving to restore that soft, bakery-style texture.
- Freezing: If you want to save it for later, cut the cake into slices, wrap each slice tightly in plastic wrap, and freeze for up to 2 months.
Creative Reuse Ideas:
Don’t let leftover cake go to waste—turn it into new desserts!
- Chocolate trifle: Layer chunks of cake with whipped cream, chocolate ganache, or pistachio cream for an indulgent treat.
- Cake pops: Crumble leftover cake, mix with frosting, shape into balls, and dip in melted chocolate for fun, bite-sized desserts.
- Dessert topping: Crumble the cake over ice cream or yogurt for an instant chocolate boost.
- Chocolate fondue accompaniment: Cut into cubes and dip into chocolate fondue for a luxurious snack or party dessert.
These storage tips and creative reuse ideas ensure nothing goes to waste, and every bite of your chocolate dessert continues to feel fresh, decadent, and special. With a little planning, your homemade Dubai chocolate cake recipe can delight friends, family, or even just your own sweet cravings for days.
Conclusion: Your Luxurious Dubai Chocolate Cake Awaits
Congratulations! By following this Dubai chocolate cake recipe, you’ve created a dessert that’s rich, indulgent, and worthy of any celebration—or just a special moment at home. From the velvety chocolate cake base to the luxurious melted chocolate and optional pistachio touches, every bite is a reminder that homemade desserts can be both elegant and approachable.
This recipe proves that you don’t need a professional bakery to enjoy a luxurious chocolate dessert. With quality ingredients, attention to detail, and a few insider ChocoChefAI tips, your cake is not only beautiful and delicious but also customizable. Whether you stick to the classic version or experiment with creative variations, this cake is flexible enough to suit any occasion or taste preference.
Remember: the joy of baking isn’t just in the end result—it’s in the process. Mixing, folding, tasting, and even cleaning up is all part of the experience. So share it with loved ones, savor a quiet moment for yourself, or use the leftovers to craft new desserts. Every step, every bite, celebrates chocolate in its most luxurious, Dubai-inspired form.
With this recipe in your repertoire, you now have a tried-and-true guide to making the best chocolate cake—moist, flavorful, and unforgettable—anytime you want to impress, indulge, or simply treat yourself.
Related Recipes: Explore More Chocolate Delights
If you loved this Dubai chocolate cake recipe, you’ll definitely want to try these other indulgent chocolate treats. Each one is designed to bring rich flavor, luxurious texture, and a touch of creativity to your kitchen adventures.
- Chocolate Cupcakes with Chocolate Frosting: Perfect for parties or gifting, these mini delights use the same rich cocoa and melted chocolate techniques.
- Dark Chocolate Pistachio Cupcakes: A smaller, elegant version inspired by the Middle Eastern flavors of Dubai.
- Chocolate Bar Cake: A dense, fudgy cake topped with a smooth chocolate glaze and optional pistachio crunch.
- Milk Chocolate Celebration Cake: Sweet, light, and perfect for birthdays or family gatherings.
- Luxury Middle Eastern Chocolate Desserts: Explore layered desserts, truffles, or chocolate-topped pastries inspired by Dubai’s famous chocolate bars.
These recipes complement your chocolate dessert repertoire and offer creative ways to enjoy the richness of chocolate in every form—from cupcakes to multi-layered masterpieces.
FAQs: Dubai Chocolate Cake Made Easy
Q1: How long should I bake a Dubai chocolate cake?
A: Bake at 350°F (175°C) for 30–35 minutes in a preheated oven. Insert a toothpick in the center—if it comes out with a few moist crumbs, it’s done
Q2: Is it possible to use milk chocolate in place of dark chocolate?
A: Absolutely! Milk chocolate creates a softer, sweeter cake, while dark chocolate gives a richer, more intense flavor. You can also mix both for a balanced taste.
Q3: What makes this cake a “Dubai-style” chocolate cake?
A: The signature Dubai chocolate cake combines a moist, tender crumb with bold chocolate flavor, often complemented with luxurious touches like pistachio cream, ganache, or chocolate layers inspired by Dubai’s famous chocolate bars.
Q4: Can I make this cake gluten-free or healthier?
A: Yes! Substitute all-purpose flour with a high-quality gluten-free blend and use natural sweeteners to create a lighter, healthier pastry version. The cake will remain moist and flavorful.
Q5: How should I store leftovers?
A: Keep at room temperature in an airtight container for 2–3 days, or refrigerate for up to 5 days. For longer storage, freeze slices for up to 2 months and thaw gently before serving.
Q6: Can I turn this into cupcakes?
A: Definitely! Use a mini cupcake pan and liners, and bake for 18–22 minutes, adjusting for size. You’ll have perfectly portioned chocolate cupcakes with the same luxurious taste.
Q7: How can I make it extra chocolatey?
A: Add chocolate chunks, a drizzle of ganache, or a thin layer of melted chocolate between layers. Even a small addition of coffee or espresso enhances the chocolate depth without affecting sweetness.
Q8: Can I add nuts or other toppings?
A: Yes! Pistachios, almonds, or chocolate shavings elevate both flavor and presentation. These toppings also give your cake a more professional, bakery-style finish.