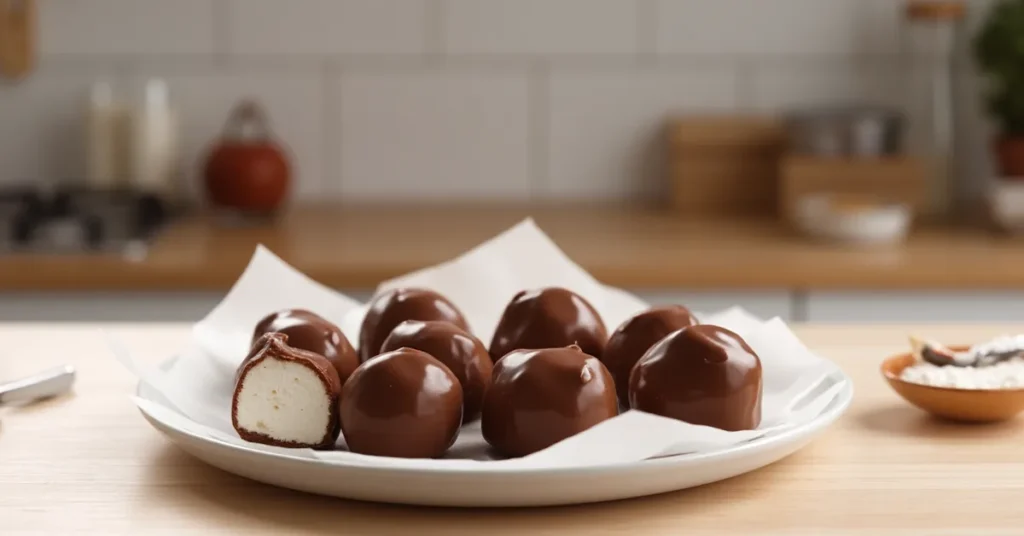
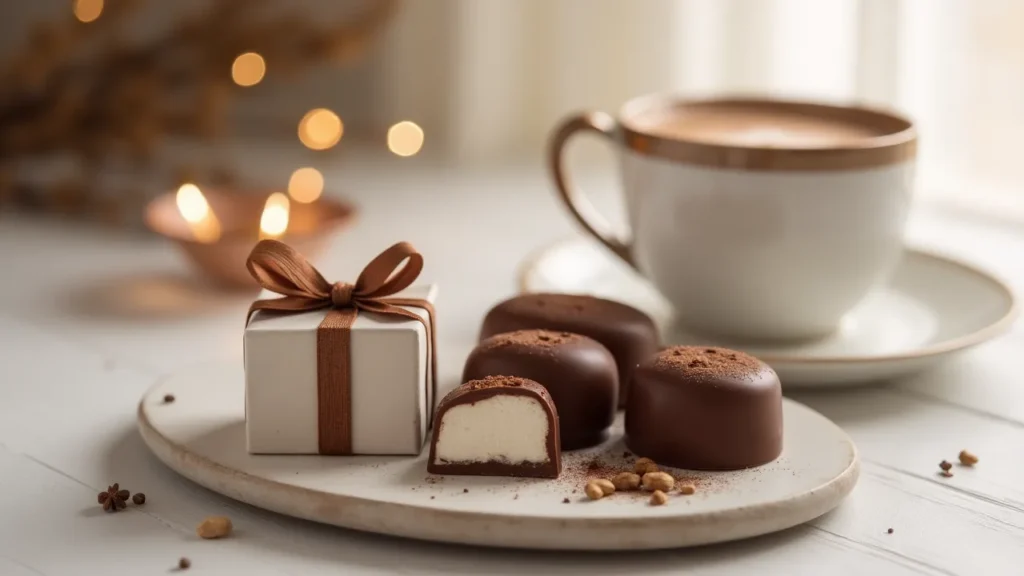
Chocolate Marshmallow
Table of Contents
Introduction – Chocolate Marshmallow
There’s something irresistibly nostalgic about the combination of chocolate and marshmallows. Whether you’re thinking of cozy winter nights with a steaming mug of Swiss Miss hot cocoa with marshmallows or dreaming of homemade treats dipped in rich, melted chocolate, this recipe brings that joy to life — with a fun, modern twist.
In just 3 simple steps, you’ll learn how to make your own chocolate marshmallow treats at home — no baking, no stress, just pure, gooey delight. Perfect for gifting, decorating holiday trays, or melting into your favorite hot chocolate, these bite-sized indulgences are as fun to make as they are to eat.
So grab your favorite chocolate bar and a handful of marshmallows — and let’s turn a classic combo into a delicious memory you’ll want to recreate again and again.
Why Choose This Chocolate Marshmallow Recipe?
If you’re looking for a chocolate marshmallow recipe that checks all the boxes—fast, fun, and foolproof—this one’s made for you. Whether you’re a seasoned baker or just diving into DIY sweets, this is the kind of treat that brings instant joy without requiring fancy tools or hours in the kitchen.
Here’s why this 3-step recipe is worth trying:
✅ 1. It’s Seriously Easy
No tempering. No baking. No special candy thermometer. If you can melt chocolate and dip a marshmallow, you’re already halfway there.
✅ 2. Perfect for All Ages
Kids love making (and eating!) these sweet little bites. It’s a great weekend activity, party snack, or holiday treat that even little hands can help with.
✅ 3. Ready in Under 15 Minutes
When those chocolate cravings hit, you won’t have to wait. This fast recipe is perfect for last-minute desserts or spontaneous snacking.
✅ 4. Versatile & Giftable
Use white, milk, or dark melted chocolate. Decorate with sprinkles, crushed nuts, or a drizzle of caramel. Wrap a few in cellophane and—voilà!—you’ve got a homemade edible gift.
✅ 5. Tastes Like a Hug in Every Bite
Soft, fluffy marshmallows meet rich, silky chocolate. Whether you’re adding them to a Swiss Miss hot cocoa or popping them straight into your mouth, they deliver comfort and delight with every bite.
Sure! Here’s the recipe summary for your Chocolate Marshmallow article, presented in a clear, professional table format:
🍫 Chocolate Marshmallow Recipe Summary
| Recipe Details | Information |
| Preparation Time | 10 minutes |
| Cooking Time | 0 minutes (no baking required) |
| Total Time | 10 minutes |
| Servings | 12 pieces |
| Calories per serving | Approx. 95 kcal |
| Categorize Recipe | Details |
| Course | Snack, Dessert |
| Cooking Method | No-bake |
| Difficulty Level | Very Easy |
| Cuisine | American (with homemade twist) |
| Skill Level | Beginner |
With just a few ingredients and your favorite kind of chocolate, these marshmallows coated in chocolate will become a go-to treat you’ll want to make again and again. Let’s move on to what you’ll need to get started!
Ingredients & Tools You’ll Need
Before we dive into making these irresistible chocolate marshmallows, let’s get everything set up. This isn’t a complicated recipe — in fact, it’s part of its magic. With just a few simple ingredients and basic kitchen tools, you’ll be ready to whip up a batch of sweet, chocolate-coated joy in no time.
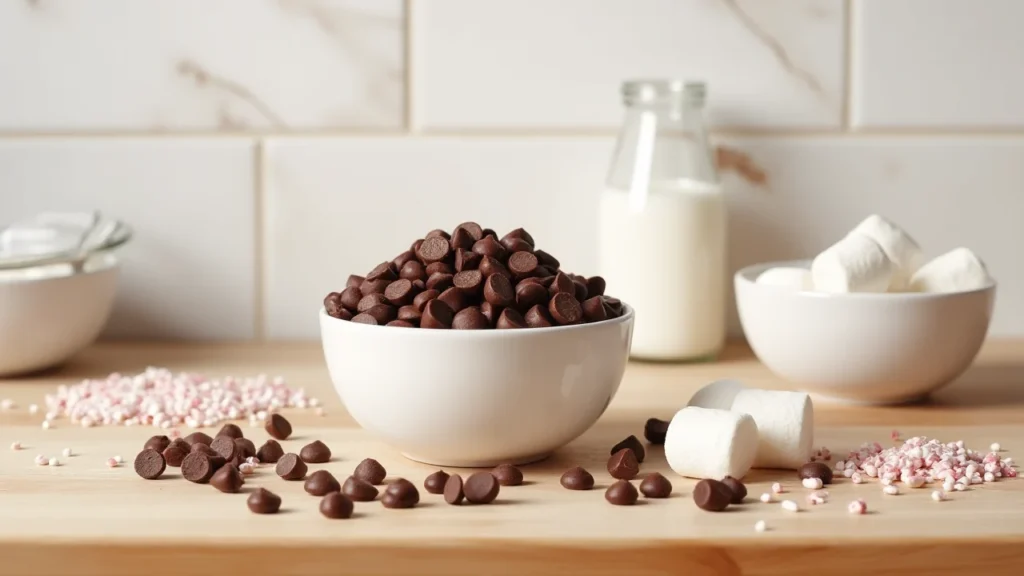
Ingredients (for about 15 chocolate marshmallows)
- 15 large marshmallows (classic, vegan, or flavored — your choice!)
- 200g (7 oz) melted chocolate : Choose your favorite: milk chocolate, dark chocolate, or white chocolate
- 1 tsp coconut oil (optional, for smoother melting)
- Toppings (optional but fun!) : Crushed peppermint, mini sprinkles, chopped nuts, shredded coconut, cocoa powder, or sea salt flakes
💡 Want that Swiss Miss vibe? Use mini marshmallows instead for tiny hocolate-covered bites perfect for hot cocoa.
Basic Tools You’ll Need
- Microwave-safe bowl or a double boiler for melting chocolate
- Spoon or fork (for dipping and coating)
- Parchment paper or silicone baking mat
- Tray or plate (to hold the dipped marshmallows while they set)
- Toothpicks or dipping forks (optional, but helpful for cleaner results)
Ingredient Notes & Swaps
- Marshmallows – Go classic, jumbo, or mini. You can also try homemade or gelatin-free marshmallows for a vegan twist.
- Chocolate – Use high-quality bars or chips. Semi-sweet works great for a balanced flavor, while milk chocolate gives a smoother, sweeter finish.
- Coconut oil – Helps your melted chocolate coat more evenly and gives a glossier finish.
With your ingredients lined up and your tools at hand, you’re now ready to create something delicious in just minutes. Let’s jump right into the step-by-step process!
Preparation Steps in Detail (Only 3!)
Ready to make your chocolate marshmallows? This is where the fun begins. You won’t need fancy tools or special skills — just a bit of melted chocolate, a tray, and your sweet tooth. Here’s how to make this fast recipe in just three easy steps:
Step 1: Melt the Chocolate
- Place your chocolate chips or chopped bar in a microwave-safe bowl.
- Add 1 tsp of coconut oil to help create a silky, easy-to-dip consistency.
- Microwave for 20 seconds at a time, stirring in between, until the texture is smooth.
(Alternatively, use a double boiler on low heat for a gentler melt.)
Pro tip: Don’t overheat! Chocolate burns quickly. Stop when it’s almost melted and stir to finish the job.
Step 2: Dip the Marshmallows
- Line a tray with parchment paper or a silicone mat.
- Using a fork or skewer, dip each marshmallow into the melted chocolate.
- Let excess chocolate drip off, then place on the tray.
- While still wet, sprinkle on your favorite toppings (crushed nuts, sprinkles, cocoa powder, etc.).
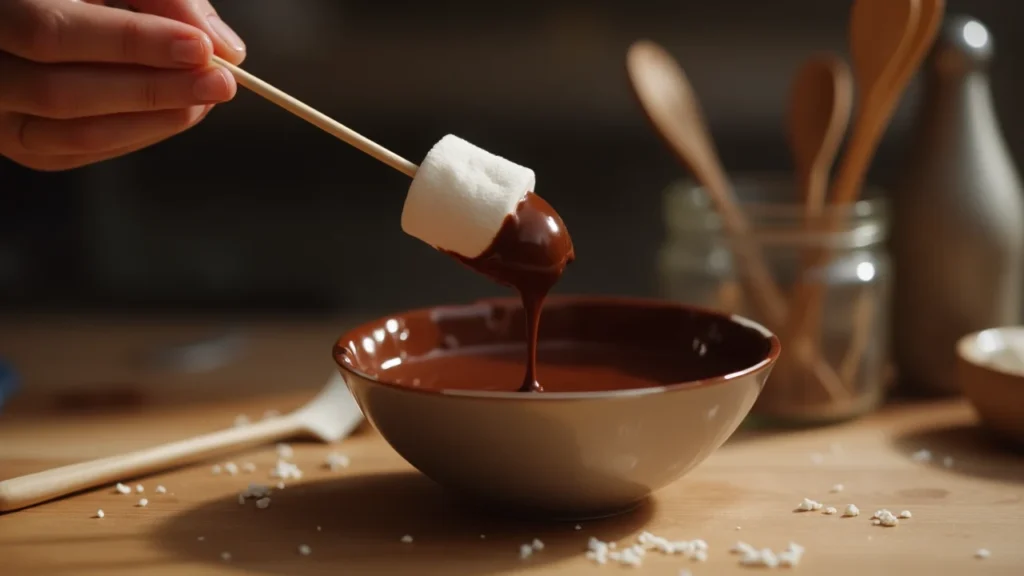
For double-dipped marshmallows: let the first coat set, then repeat for a thicker chocolate shell.
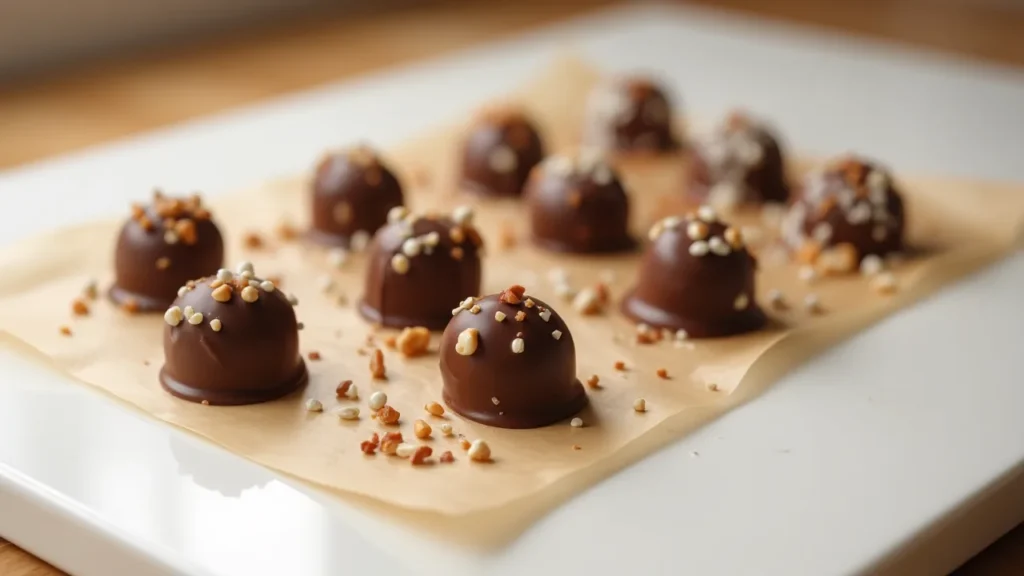
Step 3: Set and Enjoy
- Let the marshmallows rest at room temperature for 15–20 minutes, or pop them into the fridge for 10 minutes to speed up the process.
- Once the chocolate has hardened, they’re ready to enjoy — or gift!
Storing for later? Keep in a sealed container at room temp for up to 5 days
And that’s it! With just a few simple steps, you’ve created an irresistible chocolate marshmallow treat that looks fancy but takes no time at all. Great for parties, gifts, or late-night snacks — no baking required.
ChocoChefAI’s Tip: Elevate Your Chocolate Marshmallows Like a Pro
With the basics down, you’re ready to enhance your chocolate marshmallow recipe using a few professional tricks. These little touches can turn a simple treat into something worthy of a patisserie window—or a viral moment on Instagram.
1. Use High-Quality Chocolate
Your final result is only as good as your base. Choose a premium chocolate bar or couverture chocolate for richer flavor and smoother coating. Avoid waxy, low-grade chips.
Want a shinier finish? Temper your chocolate or add a small spoon of coconut oil while melting.
2. Decorate Like You Mean It
Instead of just dunking and drying, go a step further:
- Drizzle on some contrasting chocolate (think white on dark for a nice pop)
- lightly dust with crushed peppermint or freeze-dried raspberry powder.
- Dip halfway for a trendy two-tone look.
3. Timing is Everything
- Dip your marshmallows quickly and confidently while the chocolate is freshly melted.
- If it starts to harden, reheat in 10-second bursts to keep it fluid and easy to work with.
4. Turn It Into a Gift
Package 2–3 marshmallows in clear cellophane, secured with a ribbon and gift tag, for a charming homemade edible present. Add them to a hot cocoa kit with a sachet of Swiss Miss milk chocolate and a cute mug.
5. Make-Ahead Magic
These treats store wonderfully. Make a larger batch ahead of time and keep them fresh in an airtight container. They also freeze well, making them perfect for future snacking
Little details make a big difference. With these tips, your marshmallows coated in chocolate won’t just taste amazing—they’ll look stunning too. Let’s explore how you can get creative with flavors and textures in the next section!
Creative Variations to Try
Once you’ve nailed the basic chocolate marshmallow recipe, it’s time to have some fun. Think of these little treats as a blank canvas—ready to dress up for any season, occasion, or craving. Whether you’re making them for a cozy movie night or as gifts during the holidays, these creative variations will keep things exciting (and delicious).
1. Flavor-Infused Marshmallows
Upgrade your marshmallow base before even dipping:
- Consider using flavored marshmallows such as vanilla bean, strawberry, or peppermint for an added layer of taste.
- Use homemade marshmallows for that artisanal touch.
2. Switch Up the Chocolate
The type of melted chocolate you use makes a big difference:
- Dark chocolate for a rich, elegant flavor.
- White chocolate for a sweeter, creamier twist.
- Use milk chocolate to capture the familiar taste of classic Swiss Miss hot cocoa paired with marshmallows
Mix and match for fun contrast—dip in dark and drizzle with white!
3. Add a Filling Surprise
Take things up a notch by stuffing your marshmallows:
- Use a skewer to make a small cavity, then pipe in caramel, peanut butter, or Nutella before dipping.
The result? A gooey center wrapped in a chocolate shell… pure magic.
4. Dress Them Up with Toppings
Toppings don’t just add crunch—they make your chocolate covered marshmallows look professionally made:
- Crushed graham crackers (hello, s’mores!)
- Toasted coconut
- Crushed freeze-dried fruits
- Sprinkles for parties or themed colors for holidays
5. Transform into Other Treats
Once set, use your chocolate marshmallows as:
- Hot cocoa toppers – drop one into a mug for instant cozy.
- Cupcake toppers – add to chocolate cupcakes for a double-sweet bite.
- Party skewers – alternate fruit and marshmallows on sticks and drizzle with chocolate.
No matter how you personalize them, these marshmallows dipped in chocolate are endlessly customizable. Let your creativity (and your sweet tooth) lead the way! Ready to store or gift them? Let’s talk conservation and reuse next.
Conservation & Reuse: Keep Your Chocolate Marshmallows Fresh and Fun
Once your chocolate marshmallows are beautifully set and ready to enjoy, it’s important to store them properly so they stay just as delicious as day one. Whether you’re prepping for a party or saving a few for later, here’s how to keep them fresh — and even reuse them in new, tasty ways.
How to Store Chocolate Covered Marshmallows
Room Temperature (Best for Short-Term Enjoyment):
- Store in an airtight container at room temperature.
- Keep away from heat or direct sunlight to prevent melting.
- Good for up to 5 days.
Refrigerator (for Warm Climates):
- If it’s hot or humid where you live, pop the container in the fridge.
- Let them sit at room temp for a few minutes before eating for a softer texture.
- Lasts up to 7–10 days when well-sealed.
Freezer-Friendly Option:
- Place marshmallows on a tray to freeze individually (15–20 minutes).
- Transfer to a zip-lock freezer bag.
- Keep for up to 2 months.
- Let thaw at room temperature before serving — no microwave needed.
How to Reuse or Repurpose Leftovers
Make the most of your leftovers—use these delicious ideas to repurpose any remaining chocolate-dipped marshmallows.
- Hot Cocoa Drop-Ins: Toss one or two into a mug of Swiss Miss milk chocolate or homemade hot cocoa for an instant upgrade.
- S’mores 2.0: Sandwich between graham crackers and toast slightly for a gourmet twist.
- Dessert Garnish: Use as toppings on cakes, cupcakes, brownies, or even sundaes.
- Skewer & Serve: Create fun marshmallow kabobs with fruits and drizzle with more chocolate or caramel.
Bonus: You can even chop them into chunks and mix into cookie or brownie batter for a gooey surprise!
With proper storage and a little creativity, your chocolate marshmallow treats can stay delicious well beyond the day you make them. And the best part? You’re never more than a few seconds away from turning them into something new and exciting. Let’s wrap it up with a sweet little conclusion next!
Conclusion: Sweet Simplicity in Every Bite
And there you have it — easy chocolate marshmallows in just 3 steps, made right in your kitchen with no stress and tons of fun! Whether you’re dipping for a last-minute treat, creating edible gifts, or prepping a cozy hot cocoa bar, this recipe delivers that perfect balance of melty chocolate and fluffy goodness every single time.
Why you’ll keep coming back to this recipe:
- It’s super fast — ready in minutes, not hours.
- It’s versatile — customize with toppings, fillings, and chocolate types.
- It’s kid-friendly and crowd-pleasing — fun to make and even more fun to eat.
From late-night snacks to holiday parties, these homemade chocolate-covered marshmallows add that nostalgic charm with a gourmet twist.
If this became your new favorite go-to dessert, don’t stop here! Scroll down to the next section for related recipes, and explore more delicious creations from ChocoChefAI that blend simplicity with chocolate magic.
Related Recipes You’ll Also Love
Once you’ve fallen in love with this chocolate marshmallow recipe, you might find yourself craving even more easy, chocolatey creations. Whether you want to explore new flavors, textures, or seasonal ideas, these hand-picked recipes from ChocoChefAI are the perfect next step in your sweet journey.
Hot Chocolate Bombs (Explosive Fun in a Mug!)
Experience melted chocolate magic with these trendy hot cocoa bombs. Simply add to hot milk and enjoy as the marshmallows emerge and melt, creating a rich, indulgent drink.
Perfect for: winter evenings, gifting, or impressing guests.
Chocolate Banana Bites (Frozen Treats Made Easy)
Frozen banana slices dipped in dark chocolate and sprinkled with nuts or coconut. An effortless treat that feels indulgent, but healthier.
Great alternative when you’re looking for something fruity but still chocolate-covered.
Chocolate Dipped Strawberries (Romantic & Elegant)
A classic that’s always a hit. Pair your marshmallow chocolate treats with juicy strawberries dipped in silky melted chocolate.
Ideal for: date nights, Valentine’s Day, or festive dessert platters.
Christmas Peppermint Bark with Marshmallows
Layers of white and dark chocolate swirled with crushed candy canes and mini marshmallows. A holiday favorite that’s fun to gift.
Give mixing this a shot using any leftover chocolate you have from the recipe!
Swiss Miss Hot Cocoa with Marshmallows Upgrade
Take your favorite packet of Swiss Miss marshmallow cocoa and top it with a chocolate-covered marshmallow skewer for extra decadence.
Because why settle for basic when you can make it unforgettable?
These easy chocolate recipes are all about joy, comfort, and creativity in the kitchen. Bookmark your favorites, mix and match, and don’t hesitate to come back for more ChocoChefAI magic whenever you need a sweet escape.
FAQs – About Chocolate Marshmallows
Still curious? You’re not alone! Here are the most frequently asked questions about making chocolate marshmallows at home — with clear answers to help you get the perfect results every time.
1. Is it possible to substitute large marshmallows with mini ones?
Yes! Mini marshmallows work beautifully. Simply skewer 3–4 minis together on a toothpick or stick before dipping them in melted chocolate. They’re bite-sized and fun for kids.
2. What’s the best chocolate for dipping?
Use high-quality melted chocolate (dark, milk, or white). Chocolate chips are convenient, but couverture chocolate melts more smoothly and has a glossy finish. Add a teaspoon of coconut oil to help with coating if needed.
3. Do chocolate-covered marshmallows need to be refrigerated?
Only if your kitchen is warm or humid should you refrigerate them. Otherwise, keep them in an airtight container at room temperature for up to five days. For extended freshness, follow the refrigeration or freezing tips outlined in the storage section.
4. Can I reuse leftover chocolate?
Absolutely. Pour any leftover melted chocolate onto parchment paper, let it harden, and store in a sealed container. Melt it again later for another batch or to drizzle over fruit, popcorn, or cookies.
5. How do I avoid sticky or messy results?
Make sure the marshmallows are dry before dipping. Let the chocolate drip off slightly before placing them on parchment paper. Chill them quickly to set the coating evenly.