
Ezekiel bread recipe
Table of Contents
Introduction: ezekiel bread recipe
If you have ever dreamed of baking a loaf that feels both ancient and modern at the same time, this Ezekiel bread recipe may just become your new kitchen legend. Made with sprouted grains, rich in natural nutrients and flavor, it is the kind of wholesome, healthy homemade bread that makes your house smell like comfort and victory. I love how this biblical-inspired loaf proves that “good for you” can also mean delicious, satisfying, and surprisingly easy to bake.
Have you ever wondered why so many people rave about sprouted grain bread or why it’s often called one of the best gluten-free bread alternatives? You are about to find out, slice by warm slice. So roll up your sleeves, loosen your inner baker, and let’s turn simple ingredients into something nourishing, flavorful, and just a little heroic.
Why Choose This Ezekiel Bread Recipe
If you are looking for a bread that is both seriously nutritious and delightfully satisfying, this Ezekiel bread recipe is your new best friend. Unlike regular loaves, this one is made with sprouted grains, which means more natural nutrients, better flavor, and a wonderfully hearty texture. Think of it as bread with a personality: wholesome, confident, and just a little heroic in the health department.
You will love this recipe because it strikes that magical balance between healthy homemade bread and genuine comfort food. It is great for everyday meals, perfect for conscious eaters, and surprisingly accessible even if you are not a professional baker. Plus, it is inspired by ancient wisdom while still fitting beautifully into a modern kitchen routine—proof that good food never goes out of style.
Here is why so many bakers choose it:
- Nutrient-rich goodness: Sprouted grains bring extra flavor and natural benefits.
- Wholesome and satisfying: Dense yet soft, with real character in every slice.
- Beginner-friendly steps: Clear guidance so you feel confident from bowl to oven.
- Perfect for daily use: Toast it, sandwich it, or enjoy it warm with butter—no judgment.
In short, this is not just bread; it is an experience. It is the kind of loaf that makes you proud to say, “Yes, I baked that… and yes, it’s packed with real goodness.”
Here’s a professional, visually appealing recipe summary table for your Ezekiel bread recipe:
| 🍞 Recipe Details | ⏱ Time / Portions / Calories |
| 🕒 Preparation Time | 20 minutes |
| 🔥 Cooking Time | 40 minutes |
| ⏳ Total Time | 1 hour 15 minutes (including rising) |
| 🍽 Portions | 1 loaf (about 12 slices) |
| 🔢 Calories | ~120 kcal per slice |
| 📌 Categorize Recipe | 📝 Details |
| 🍽 Course | Breakfast, Snack, or Everyday Bread |
| 🍳 Cooking | Oven-baked (or bread machine option) |
| ⚡ Difficulty | Moderate |
| 🌍 Cuisine | Biblical / Ancient Grain Inspired |
| 🎓 Skill Level | Beginner to Intermediate |
Ingredients and Essential Equipment
Before we dive into mixing, kneading, and creating magic, let’s set you up for success with everything you need to bake the perfect Ezekiel bread with sprouted grains. Think of this as your friendly, slightly bossy kitchen coach ensuring you are fully prepared. A well-organized setup means less stress, fewer “oops” moments, and a loaf of healthy homemade bread that rises beautifully and tastes even better.
✔ Must-Have Ingredients (Measured and Ready)
These classic Ezekiel bread ingredients bring both flavor and nutrition to every slice:
- 2 cups sprouted wheat
- 1 cup sprouted barley
- 1 cup sprouted millet
- ½ cup sprouted lentils
- ½ cup sprouted beans
- 2 ½ cups warm water
- 2 tablespoons honey (natural sweetness always wins)
- 2 tablespoons olive oil
- 2 teaspoons active dry yeast
- 1 ½ teaspoons salt
Short tip from one baker to another: measure everything before you start. Future-you will be grateful.

🛠 Equipment You Actually Need
Good news: you do not need a professional bakery setup to make incredible sprouted grain bread. Just gather:
- A large mixing bowl
- A sturdy wooden spoon or stand mixer
- Measuring cups and spoons
- A loaf pan
- Clean kitchen towel
- Oven (or bread machine, if that’s your kitchen best friend)
💡 Helpful Preparation Tips
- Use warm—not hot—water to help the yeast activate.
- A kitchen scale can make your measurements even more precise.
- If you are using a bread machine, this recipe adapts beautifully.
With your ingredients gathered and your tools lined up, you are already halfway to baking a loaf that feels hearty, nourishing, and wonderfully homemade. Let’s keep that momentum going.
Preparation Steps in Detail
Ready to transform those wholesome ingredients into a beautiful loaf of Ezekiel bread? Take a deep breath, relax your shoulders, and imagine the smell of warm, healthy homemade bread filling your kitchen. This process is simple, friendly, and incredibly rewarding—just follow along, and I’ll guide you like a baking buddy who refuses to let you fail.
⭐ Step-by-Step Method (Clear, Calm, and Foolproof)
Step 1: Wake up the yeast
Pour the warm water into a bowl, then add the honey and yeast. Stir gently and let it sit for 5 to 10 minutes, until a frothy layer forms on top. If it starts bubbling like a tiny celebration, you’re doing it right.
Step 2: Mix the sprouted grains
In a large bowl, combine the sprouted wheat, barley, millet, lentils, and beans. Add the salt and mix well, making sure everything is evenly distributed and ready to work together.
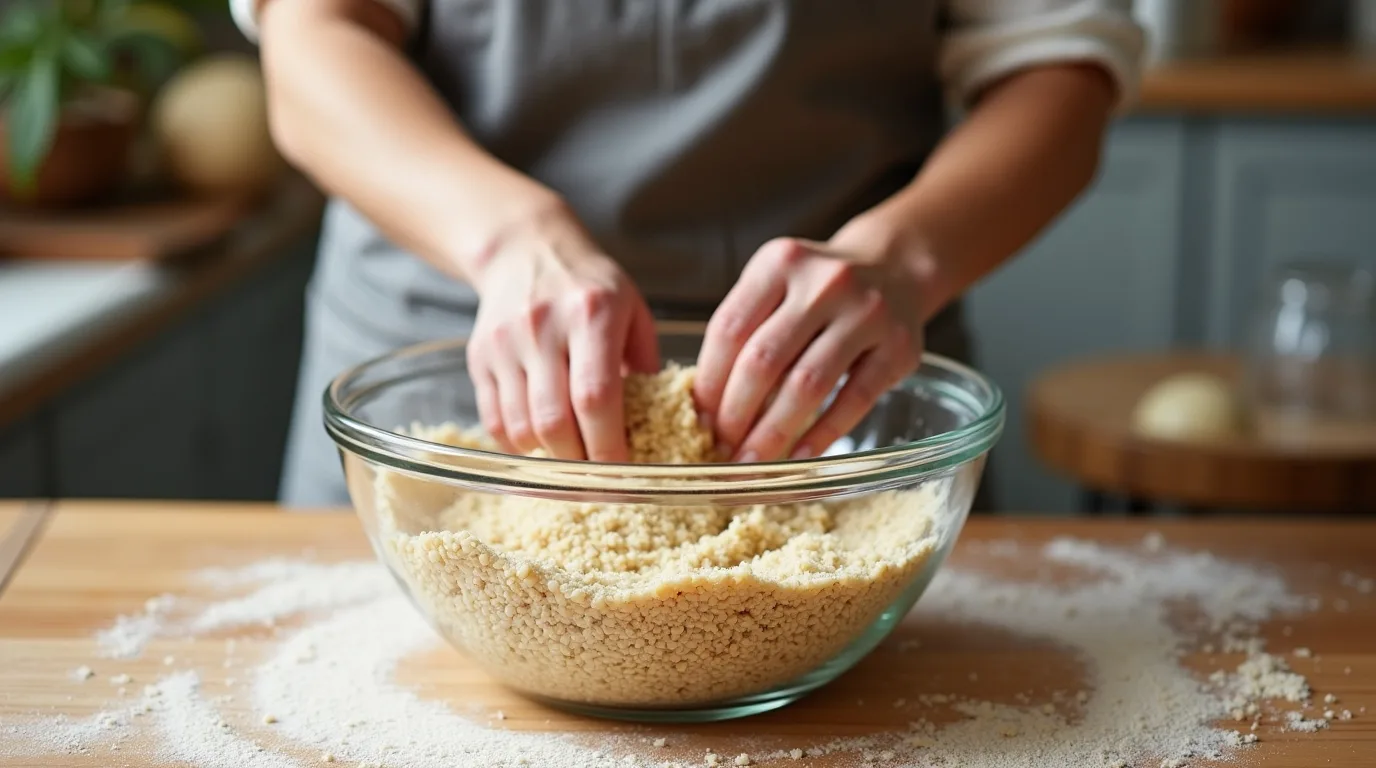
Step 3: Create the dough
Gradually pour the yeast mixture into the grains, then add the olive oil. Stir until a sticky dough comes together. Don’t worry about perfection—this dough is meant to be hearty, rustic, and full of character.
Step 4: Knead with care
Move the dough to a lightly floured surface and knead for 8 to 10 minutes, until it becomes smooth and elastic. If it feels too sticky, lightly dust your hands with flour—just enough to help, not overwhelm.
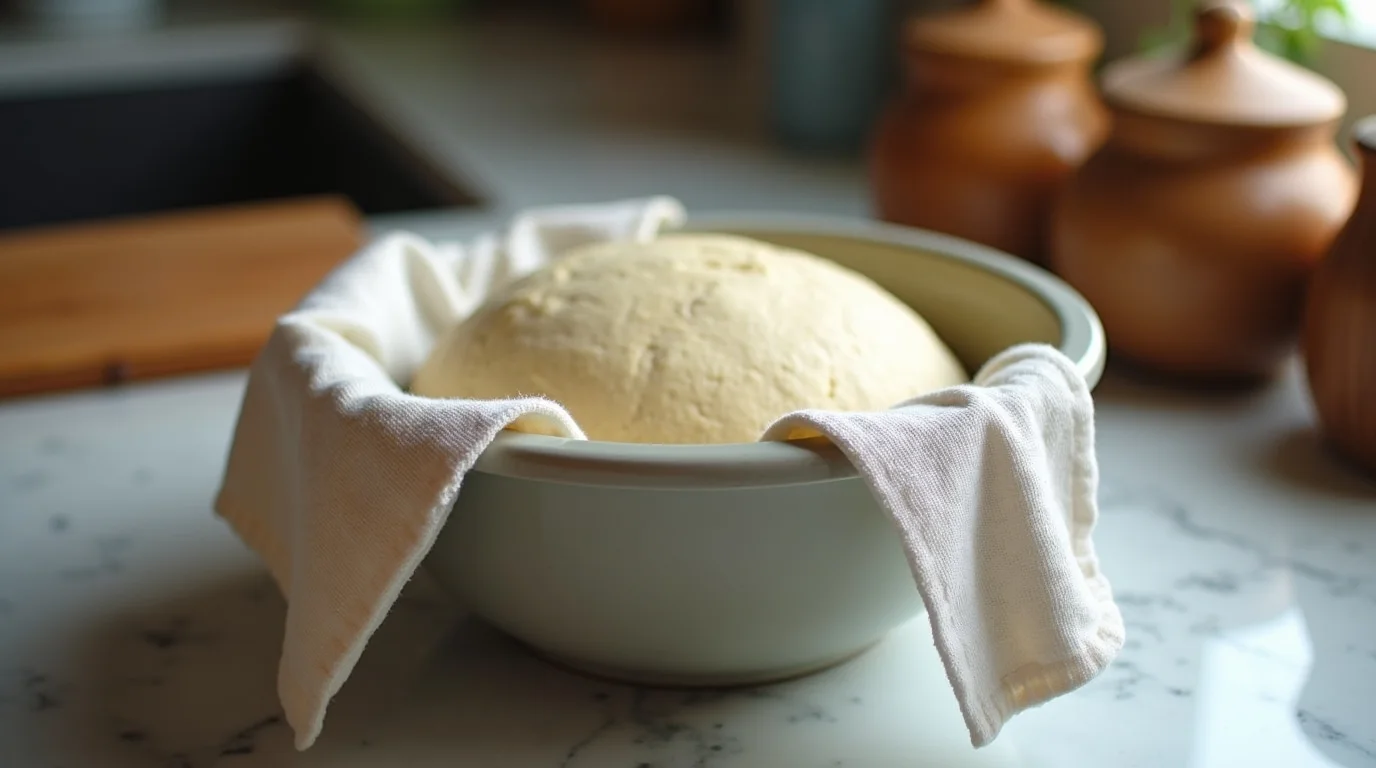
Step 5: First rise
Set the dough into a lightly greased bowl and cover it with a clean kitchen towel. Leave it in a warm place for about an hour, or until it has doubled in volume. This is its peaceful time to rise—give it space and patience.
Step 6: Shape the loaf
Gently press the dough to release excess air, then shape it into a loaf. Transfer it to a greased loaf pan, smooth the top with your hands, and admire your work.
Step 7: Final rise and baking
Let the dough go through a second rise for roughly 30 minutes. In the meantime, preheat your oven to 350°F (180°C). Bake for 35 to 40 minutes, until the loaf is golden, aromatic, and sounds hollow when tapped. Simple, satisfying, and absolutely worth it.
💡 Helpful Baking Tips for Success
- If your kitchen is cold, let the dough rise near a warm oven or wrapped in a towel.
- Want extra texture? Sprinkle seeds on top before baking.
- Let the bread cool before slicing—trust me, waiting is the hardest but most rewarding part.
With these simple Ezekiel bread preparation steps, you are not just baking bread—you are creating something nourishing, flavorful, and proudly homemade.
ChocoChefAI Tip – Your Secret to Perfect Ezekiel Bread
Here is where a little smart strategy meets delicious results. If you want your Ezekiel bread to taste bakery-level amazing every single time, think of this section as your behind-the-scenes advantage. We are talking flavor, texture, and that confident “oh yes, I nailed this” feeling when you slice into your healthy homemade bread.
💡 The Smart Trick for Better Texture and Flavor
Most people rush their loaf. Please don’t. Giving your dough just a little extra love changes everything. Try this:
- After kneading, let the dough rest for 10 minutes before shaping.
- This short “spa break” relaxes the gluten and makes shaping easier.
- This results in a softer crumb and a wonderfully even bake throughout.
🧠 Boost the Nutrition and Taste Naturally
Want to take it even further? Here are a few subtle upgrades that make a big difference:
- Add 1 tablespoon of olive oil for extra moisture and a smoother crumb.
- Mix in a teaspoon of honey for gentle sweetness without overpowering the sprouted grains.
- If you love extra character, sprinkle seeds on top before baking for crunch and visual charm.
🔥 Temperature & Baking Confidence Tip
- Always preheat your oven fully. A hot, ready oven helps your sprouted grain bread rise properly.
- If the top browns too quickly, loosely cover it with foil during the last minutes of baking.
Think of this ChocoChefAI tip as your friendly voice in the kitchen saying, “Relax, you’ve got this.” With a bit of patience, a touch of care, and these practical baking secrets, your Ezekiel bread recipe will consistently deliver flavor, nutrition, and pure homemade satisfaction.
Creative Variations – Make Your Ezekiel Bread Unforgettable
One of the joys of baking Ezekiel bread is how versatile it can be. Once you have mastered the base Ezekiel bread recipe, you can easily customize it to match your mood, your meals, or that sudden burst of culinary curiosity. Think of this section as your playground—still healthy, still wholesome, but with endless delicious possibilities.
🌾 Savory Variations – For Bold, Flavorful Bread
If you love depth, aroma, and a loaf that confidently stands beside soups, salads, or grilled dishes, try these savory twists:
- Add garlic powder, rosemary, or thyme for fragrant sprouted grain bread with character.
- Mix in sunflower seeds, pumpkin seeds, or sesame seeds for crunch and extra nutrients.
- Fold in grated cheese for a richer, more indulgent bite while still keeping it homemade and thoughtful.
🍯 Sweet Variations – Gentle, Comforting, and Delightful
Prefer something a little cozier? These options give your healthy homemade bread a soft, lightly sweet personality:
- Stir in a little cinnamon and a touch of extra honey.
- Mix in raisins, dried cranberries, or chopped dates to bring a touch of natural sweetness.
- For a touch of fun, sprinkle a few dark chocolate chips into the dough—unexpected, but wonderfully comforting.
👩🍳 Helpful Tips for Success
- Keep add-ins balanced so your dough structure stays strong.
- Mix flavor extras evenly so every bite tastes intentional, not accidental.
- Start small with quantities—you can always add more next time.
With these creative variations, your Ezekiel bread becomes more than a recipe; it becomes a personal expression of taste, mood, and creativity. Whether savory, sweet, bold, or comforting, you are in control—and every loaf tells a delicious story.
Conservation and Reuse – Keep Your Ezekiel Bread Fresh
Baking a beautiful Ezekiel bread loaf is just the beginning—the next step is making sure every slice stays fresh, flavorful, and ready for any meal. Whether you want to enjoy it throughout the week or plan ahead for quick snacks, proper storage and clever reuse make all the difference.
🥖 How to Store Your Bread
- Room temperature: Wrap your cooled loaf in a clean kitchen towel or place it in an airtight container. It will stay fresh for 2–3 days.
- Refrigeration: While not necessary, refrigerating can extend freshness up to 1 week, but may slightly dry the bread. Toasting brings it back to life.
- Freezing: Slice the bread before freezing and wrap each portion in plastic wrap, then place in a freezer-safe bag. It can last up to 3 months. Defrost at room temperature or lightly toast for immediate enjoyment.
♻️ Creative Reuse Ideas
Don’t let leftover bread go to waste—there are plenty of ways to give it a second life:
- Toast it for an easy breakfast and top it with nut butter or avocado for extra flavor.
- Turn it into breadcrumbs for coating vegetables or homemade meatballs.
- Make a savory strata or bread pudding for a fun weekend brunch.
- Use as a sandwich base for hearty lunches—its dense texture holds fillings beautifully.
💡 Extra Tips for Lasting Freshness
- Avoid storing in plastic for extended periods at room temperature; it can trap moisture and encourage mold.
- If freezing, consider freezing small portions to avoid thawing the entire loaf at once.
- Lightly reheating slices in the oven or toaster restores that freshly baked aroma and soft texture.
With these storage and reuse tips, your Ezekiel bread will always be ready to impress at breakfast, lunch, or a cozy snack, keeping every bite as delightful as the day it came out of the oven.
Conclusion – Your Homemade Ezekiel Bread Adventure
Congratulations! By now, you’ve journeyed from gathering wholesome sprouted grains to baking a beautiful loaf of Ezekiel bread that is both nutritious and delicious. There’s something truly satisfying about slicing into a bread you made yourself—warm, fragrant, and full of heart.
Baking this healthy homemade bread isn’t just about the end result; it’s about the experience. Kneading, shaping, and watching your dough rise gives you a sense of accomplishment that store-bought loaves simply can’t match. Plus, with the creative variations, clever storage tips, and practical baking secrets you’ve learned, you now have a versatile recipe to adapt, experiment with, and share.
Remember:
- Homemade bread connects you to centuries of baking tradition, like the original biblical bread recipes.
- Each slice is packed with nutrients, flavor, and the satisfaction of knowing exactly what went into it.
- Whether toasted with a smear of butter, layered in a hearty sandwich, or enjoyed on its own, your Ezekiel bread loaf is a winner every time.
So, go ahead—slice, share, savor, and maybe even inspire a friend to join your homemade bread adventures. Baking Ezekiel bread is more than a recipe; it’s a delicious way to celebrate health, creativity, and the simple joy of food made with love.
Related Recipes – Expand Your Baking Horizons
If you enjoyed baking this Ezekiel bread recipe, why stop there? Exploring other wholesome and creative recipes can keep your kitchen exciting while boosting your baking confidence. Here are a few tried-and-true favorites that pair beautifully with your new bread-making skills:
🍌 Sweet Treats to Try
- Chocolate Chip Banana Bread Recipe – A moist, naturally sweet loaf perfect for breakfast or an afternoon snack.
- Healthy Dark Chocolate Dessert – Rich, satisfying, and guilt-free, this recipe brings indulgence without compromise.
🥖 Savory or Specialty Breads
- Brazilian Cheese Bread Recipe – Chewy, cheesy, and fun to make, a perfect complement to any meal.
- Best Gluten Free Bread Recipes – Expand your baking repertoire with grain-free and allergy-friendly options.
- Biblical or Sprouted Grain Bread Variations – Experiment with flavors while honoring ancient recipes.
💡 Tips for Exploring Further
- Combine techniques: Use insights from your Ezekiel bread recipe when trying new bread recipes, like proofing or kneading methods.
- Keep a flavor notebook: Track what add-ins or tweaks you love most for each recipe.
- Share and compare: Baking with friends or family turns each recipe into a fun, collaborative adventure.
Diving into these related recipes allows you to continue experimenting with sprouted grains, healthy pastries, and flavorful breads, making your kitchen a hub of creativity, nourishment, and pure culinary joy.
FAQs – Everything You Want to Know About Ezekiel Bread
Baking Ezekiel bread can raise a few questions, especially if it’s your first your first time working with sprouted grains. Here’s a friendly guide to answer the most common queries, so you feel confident from start to finish.
❓ Is Ezekiel bread gluten-free?
Not exactly. Classic Ezekiel bread is crafted from a blend of sprouted wheat, barley, millet, lentils, and beans. While it’s packed with nutrients and easier to digest thanks to sprouting, it contains gluten. For a gluten-free alternative, explore other healthy bread recipes made with gluten-free flours.
❓ Can I make Ezekiel bread in a bread machine?
Absolutely! Most Ezekiel bread bread machine recipes adapt perfectly. Use the dough cycle for kneading and rising, then bake according to your machine’s instructions—or finish baking in a conventional oven for a golden crust.
❓ How long does Ezekiel bread last?
At room temperature: 2–3 days in an airtight container.
In the refrigerator: Up to 1 week (though slightly drier).
In the freezer: Up to 3 months if sliced and wrapped properly.
❓ Is Ezekiel bread healthy?
Yes! Packed with sprouted grains, fiber, and protein, it’s a nutritious choice that supports digestion, sustained energy, and overall wellness. Think of it as a biblical bread with modern health benefits.
❓ Can beginners make Ezekiel bread?
Absolutely. With clear step-by-step instructions, basic kitchen tools, and a little patience, even a first-time baker can create a delicious, wholesome loaf.
❓ Can I customize flavors or add-ins?
Yes! Use creative variations like seeds, herbs, dried fruits, or even a touch of chocolate for a sweet twist. Keep quantities balanced to maintain the perfect dough structure.