
Mug Brownie Recipe
Table of Contents
Introduction: Mug Brownie Recipe
If you’ve ever craved a rich mug brownie recipe but didn’t want to bake a whole tray, you’re in the right place. This quick chocolate dessert is the perfect mix of convenience and indulgence—an instant fix for brownie lovers who want something warm, fudgy, and ready in minutes. I love how this little treat fits every mood: late-night snack, “just one bite” moment, or a fast recipe to impress someone without turning on the oven.
Think of it as your personal chocolate hug in a cup—made with melted chocolate, simple pantry staples, and zero stress. If you’ve ever wondered how to make a brownie in a mug that’s soft, gooey, and bakery-level good, you’ll finally have the answer here. And if you’re into dark chocolate, milk chocolate, or even healthy pastry alternatives, you can adapt it any way you like.
Before we dive in, tell me—are you team ultra-fudgy or team slightly cakey? Your answer might just influence how you customize this irresistible, microwave-ready treat.
Why Choose This Mug Brownie Recipe
If you’ve ever wished you could enjoy a warm, fudgy brownie without turning on the oven, this mug brownie recipe is exactly what you need. It’s fast, comforting, and perfect for those “I need chocolate now” moments we all know too well. No complicated pastry steps, no special equipment—just a mug, a spoon, and a microwave.
Here’s why this recipe stands out from every other brownie in a mug recipe:
✔ Ready in 5 Minutes (Seriously)
From mixing to microwaving, you’ll have a hot, gooey treat faster than you can preheat an oven. Perfect when you want a quick chocolate recipe that satisfies instantly.
✔ Minimal Ingredients, Maximum Flavor
You only need a handful of pantry staples plus real melted chocolate for that rich, indulgent texture. Whether you prefer dark chocolate, milk chocolate, or something lighter, the flavor still shines.
✔ Single-Serve So You Can Indulge Without Guilt
This microwave mug brownie is portioned for one, which means no leftovers calling your name from the kitchen. It’s dessert… without the consequences.
✔ Perfect for Beginners & Busy Days
Even if you’re new to baking, this recipe is nearly impossible to mess up. And for experienced bakers, it’s a fun, fast way to satisfy cravings between bigger projects.
✔ Customizable to Fit Your Mood
Want something lighter? Add applesauce. Want something richer? Add extra melted chocolate. Want crunch? Toss in nuts. The possibilities stretch as far as your imagination.
✔ Ideal for Kids, Teens & Anyone Learning to Cook
It’s a safe, simple recipe that doesn’t require knives, stoves, or baking trays—just a microwave. A great way to spark confidence in young cooks.
Perfect! Let’s complete your mug brownie recipe article with a professional, visually appealing recipe summary:
| 🍫 Recipe Detail | Information |
| ⏱ Preparation Time | 5 minutes |
| 🔥 Cooking Time | 1–2 minutes |
| 🕒 Total Time | 6–7 minutes |
| 🍽 Portions | 1 serving |
| ⚡ Calories | ~350 kcal |
| 🥄 Category | Details |
| 🍽 Course | Dessert |
| 👩🍳 Cooking Method | Microwave |
| ⭐ Difficulty | Easy |
| 🌎 Cuisine | International |
| 🎓 Skill Level | Beginner–Intermediate |
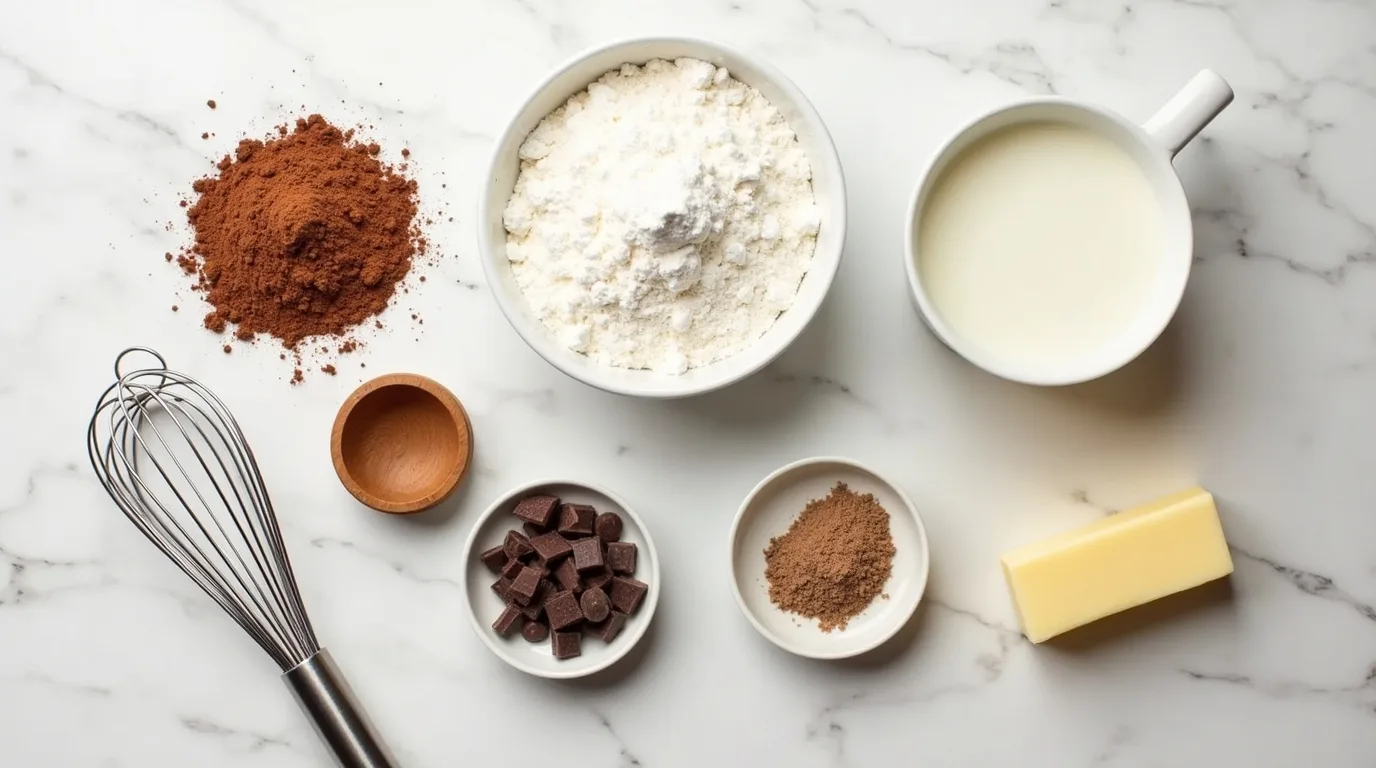
Ingredients & Equipment You Need
Before you dive into this incredibly easy mug brownie recipe, let’s make sure you have everything ready. The beauty of this dessert is that it uses simple pantry ingredients and everyday tools—nothing fancy, nothing stressful. Just pure, instant chocolate happiness.
🍫 Essential Ingredients (Measured for One Mug Brownie)
- 3 tablespoons all-purpose flour – Gives your brownie structure without making it heavy.
- 2 tablespoons unsweetened cocoa powder – Choose quality for the richest chocolate flavor.
- 2 tablespoons sugar – Adjust based on how sweet you like your chocolate desserts.
- A pinch of salt – Just enough to enhance the deep cocoa notes.
- 3 tablespoons milk – Works with dairy-free alternatives too.
- 1 tablespoon vegetable oil or melted butter – Butter adds flavor, oil adds extra moisture.
- 1 tablespoon melted chocolate – The secret to a fudgy, bakery-style texture.
- 1–2 tablespoons chocolate chips – Optional… but are they really?
- A drop of vanilla extract – Adds warmth and balance to your brownie in a mug.
Tip: If you want a lighter brownie, reduce the chocolate chips. For a richer, almost molten texture, add a bit more melted chocolate.
🍴 Equipment Required
You don’t need a full baking setup for this microwave mug brownie—just a couple of basics:
- A microwave-safe mug (10–12 oz is ideal to prevent overflow)
- A spoon or mini whisk for mixing
- A microwave (standard 800–1000 watts works perfectly)
- A small bowl (optional, if melting chocolate separately)
If you’re wondering how to make a brownie in a mug without mess: you can mix everything directly in the mug. But if you want an ultra-smooth batter, mix the wet ingredients in a separate bowl before combining.
Why These Ingredients Work So Well Together
Each ingredient plays a role, even in a quick chocolate recipe like this one:
- Flour + cocoa powder: Creates the classic brownie base.
- Oil or butter: Keeps your dessert soft and moist.
- Melted chocolate: Adds richness and improves texture, making the brownie feel “baked,” even though it isn’t.
- Chocolate chips: Little pockets of melted goodness with every spoonful.
Now that everything is measured and ready to go, let’s walk through the step-by-step process to craft the perfect mug brownie every time.
Preparation Steps in Detail
Ready to make your warm, gooey mug brownie recipe? This part is just as fun as the eating part—maybe even more. Follow these steps and you’ll create a soft, fudgy brownie in a mug that tastes like it came straight from a bakery… except it’s made in your microwave in minutes.
Step-by-Step Instructions
1. Mix the dry ingredients
Add the flour, cocoa powder, sugar, and a pinch of salt directly into your microwave-safe mug.
Give everything a quick stir to break up any cocoa clumps—smooth dry ingredients mean a smoother brownie later.
2. Add the wet ingredients

Pour in the milk, vegetable oil (or melted butter), melted chocolate, and vanilla extract.
Stir until the batter is fully combined and glossy. Don’t overmix; just make sure there are no streaks of dry flour left.
Tip: If your melted chocolate thickens too fast, warm it for 5–10 seconds so it blends easily.
3. Fold in the chocolate chips
Drop in 1–2 tablespoons of chocolate chips and gently fold them through the batter.
This step gives your brownie those dreamy molten pockets that make microwave desserts feel luxurious.
4. Microwave your brownie
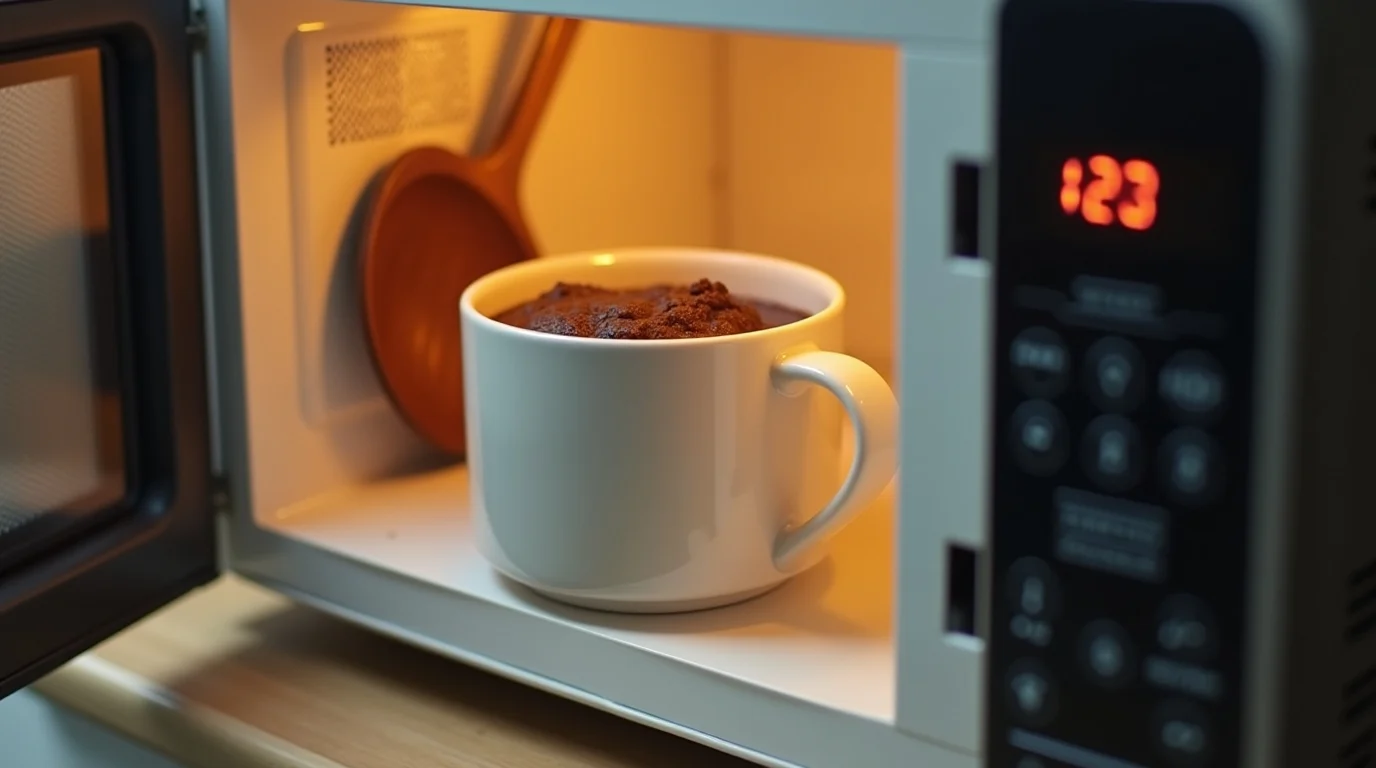
Place the mug in the center of the microwave and cook for 60–90 seconds.
Start with 60 seconds, then check the top. It should look slightly set but still glossy—like a brownie that’s just a little underbaked.
Remember: Every microwave is different. If the brownie still looks wet on top, heat it in 10-second bursts until it reaches the perfect texture.
5. Cool for 1 minute (yes, you must)
Hold off on cutting into it right away—the brownie keeps “cooking” a bit from the leftover heat. This quick pause helps it firm up without turning dry.
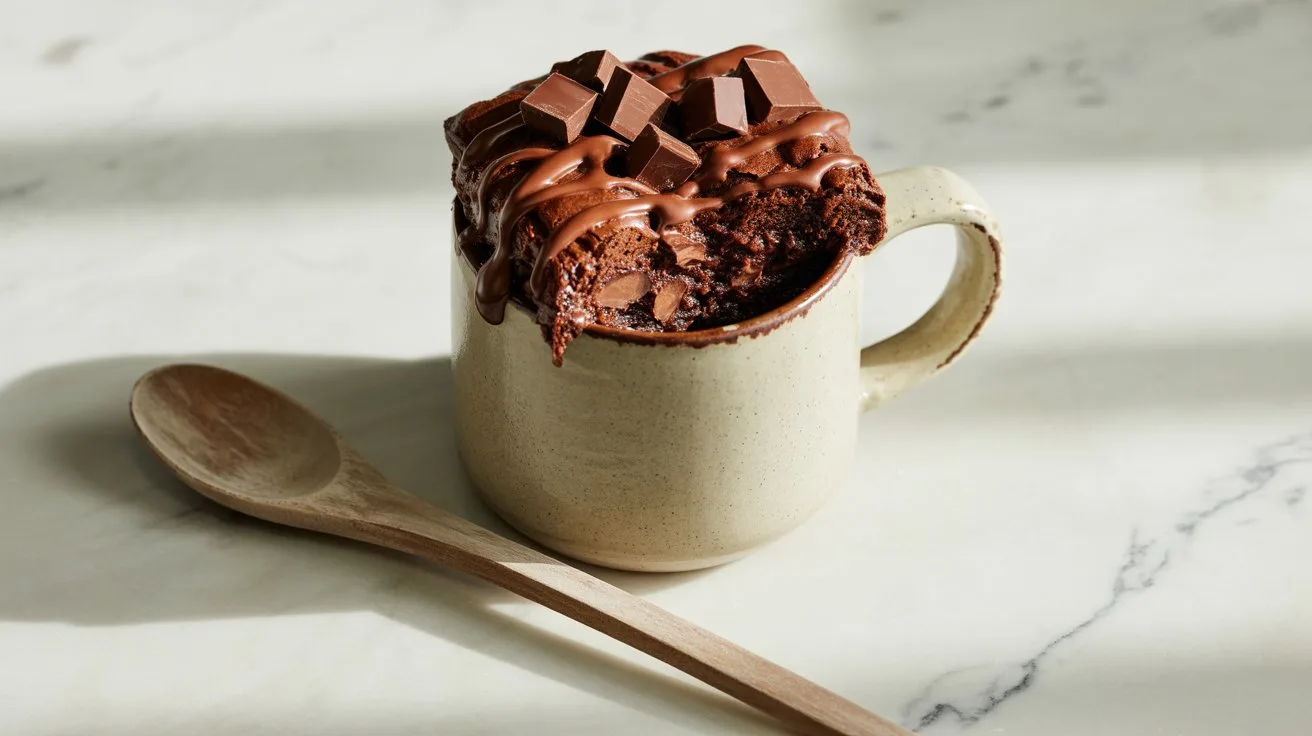
What the Perfect Microwave Mug Brownie Should Look Like
- The edges should be soft and set.
- The center should remain moist and fudgy.
- Chocolate chips should be melted and glossy.
- The aroma should scream “fresh chocolate dessert.”
Why This Method Works
Microwaves heat from the inside out, which is why mug brownies can go from gooey to dry in seconds.
Following this timing and texture guide ensures your brownie in a mug recipe stays moist, chocolatey, and dangerously addictive.
Now that you’ve mastered the core method, let’s move on to elevating your mug brownie with expert tips.
Tips to Guarantee Perfect Results Every Time
Even the simplest recipe can shine when you know the little tricks that make everything smoother. Think of these tips as the friendly whispers a seasoned chef would share while you cook — small insights that lead to big improvements. Whether you’re a beginner or already confident in the kitchen, these pointers ensure consistent, delicious results.
Choose Quality Ingredients
Great flavor always starts with great ingredients.
- Use fresh dairy, high-quality chocolate, and spices that still carry their aroma.
- When possible, choose real butter over margarine for a richer taste and creamier texture.
- Stick to the recommended chocolate type in the recipe; switching varieties can change sweetness and consistency.
High-quality basics guarantee a recipe that tastes as good as it looks.
Mind the Temperature
Temperature plays a bigger role than most people realize.
- Bring eggs and butter to room temperature before mixing — this creates a smoother blend.
- Avoid mixing warm ingredients with cold ones, which can cause lumps or split mixtures.
- Preheat your oven fully to keep cooking times accurate and ensure even baking.
Maintaining the right temperature helps your batter rise properly and cook evenly.
Mix With Care
Overmixing is one of the most common kitchen mistakes — but also one of the easiest to avoid.
- Combine ingredients just until they come together.
- Stop mixing the moment your batter looks uniform.
- For chocolate-based recipes, fold gently to preserve air and keep the texture light.
This small detail prevents dense or rubbery results and keeps your final dish soft and tender.
Use the Right Equipment
You don’t need a professional kitchen — just the right tools.
- A digital scale improves precision and eliminates guesswork.
- Good-quality baking pans heat more evenly and help prevent burnt edges.
- A silicone spatula is perfect for scraping bowls clean and reducing waste.
The right tools make the process easier and the final dish more consistent.
Don’t Skip the Cooling Step
Cooling is more important than many home cooks think.
- Allow baked goods to rest before slicing so flavors can deepen and textures can set.
- If the recipe includes chocolate components, cooling helps the structure firm up instead of collapsing.
- Transfer items to a wire rack to prevent sogginess from trapped steam.
A little patience goes a long way toward picture-perfect results.
Taste and Adjust (If Needed)
Cooking isn’t just following steps — it’s paying attention.
- If your mixture tastes too sweet, balance it with a pinch of salt.
- Too thick? A splash of milk or cream can fix it.
- Want more depth? Add a subtle hint of vanilla, espresso powder, or warm spices.
Trust your instincts — they’re a key ingredient in any successful kitchen creation.
Creative Variations
Why settle for a classic mug brownie when you can turn it into a mini chocolate adventure? These creative twists elevate your mug brownie recipe and keep every bite exciting.
1. Nutella Core
- Drop 1 teaspoon of Nutella in the center of the batter before microwaving.
- Result: a molten, chocolate-hazelnut surprise with every bite.
2. Peanut Butter Swirl
- Gently fold in a spoonful of creamy peanut butter.
- Result: rich chocolate with a nutty, luscious swirl — like a café-style treat.
3. Salted Caramel Drizzle
- Once microwaved, drizzle with caramel sauce and finish with a pinch of flaky sea salt.
- Result: sweet and salty indulgence that melts in your mouth.
4. Healthy Twist
- Swap the oil or butter for unsweetened applesauce.
- Result: a lighter, guilt-free version of your favorite microwave dessert, still fudgy and satisfying.
5. Crunchy Top
- Sprinkle crushed nuts, mini cookies, or chocolate chips on top before microwaving.
- Result: a delightful texture contrast that makes each bite extra fun.
Tip: One mug brownie recipe, endless chocolate creativity. Experiment, mix flavors, and discover your signature mug dessert!
Conservation and Smart Reuse
Even a quick treat like a mug brownie deserves a little care when it comes to storing leftovers — assuming you manage to resist eating it all in one go! Proper conservation not only preserves flavor and texture but also helps you get the most out of every single bite.
How to Store Your Mug Brownie
Although this brownie is best enjoyed warm and fresh, you can keep leftovers for later. Here’s how to maintain its chocolatey goodness:
- Let it cool all the way down before storing to avoid moisture buildup and a soggy texture.
- Cover the mug tightly with plastic wrap or transfer the brownie to a small airtight container.
- Refrigerate for up to 24 hours for optimal freshness.
This simple method keeps the brownie soft and prevents it from drying out.
How to Reheat Without Drying It Out
Microwaved desserts can turn rubbery fast, but a gentle approach can revive them beautifully.
- Place the mug back in the microwave.
- Heat for 5–10 seconds, just until warm.
- Avoid adding extra time — the brownie will dry out quickly if overheated.
If you want a softer, fudgier texture, add a teaspoon of milk or cream before reheating. It brings back moisture and enhances the rich chocolate flavor.
Creative Ways to Reuse Leftover Mug Brownie
Leftovers don’t have to be boring. With a little imagination, you can transform your cooled brownie into a brand-new dessert:
- Chocolate crumble topping: Break it into chunks and sprinkle over yogurt, ice cream, or whipped cream.
- Mini brownie parfait: Layer crumbs with vanilla yogurt, fruit, or chocolate mousse.
- Brownie “truffles”: Mash the brownie with a spoonful of cream cheese, roll into balls, and coat in cocoa powder.
- Mix-in upgrade: Crumble leftover brownie into pancake batter, waffle batter, or even oatmeal for an indulgent twist.
These small ideas turn a single mug brownie into multiple delightful treats — perfect if you love experimenting.
Avoid These Common Storage Mistakes
A few habits can accidentally damage the flavor or texture of your mug brownie:
- Don’t leave it uncovered — it dries out quickly.
- Avoid reheating several times; warm only the portion you’ll eat.
- Don’t store it for days — the texture becomes grainy, and the chocolate flavor fades.
Treating the brownie gently helps maintain its soft, fudgy interior.
Conclusion
Creating your own mug brownie recipe is one of those simple kitchen joys that never gets old. In just a few minutes, you can go from craving something chocolatey to savoring a warm, fudgy dessert right out of your favorite cup. Whether you’re rushing between tasks, treating yourself after dinner, or teaching kids how fun microwave baking can be, this recipe proves that homemade chocolate desserts don’t have to be complicated.
What makes this brownie in a mug recipe so special is its perfect balance: minimal effort, maximum flavor. You don’t need fancy equipment, expert pastry skills, or a long ingredient list. Just a few pantry staples, a microwave, and a moment to indulge.
Here’s what I hope you take away from this recipe:
- Quick can still be delicious — especially with melted chocolate enhancing depth and richness.
- Small desserts offer big flexibility — ideal for portion control, late-night cravings, or experimenting with bold flavors.
- You’re in charge — personalize your microwave mug brownie with toppings, textures, and ingredients that make it truly yours.
If you’ve ever wondered how to make a brownie in a mug recipe that actually tastes like a real brownie, this method is the answer. It’s light, comforting, and incredibly satisfying — all ready in just a few minutes.
So go ahead: grab your mug, stir up some chocolate magic, and let your kitchen become your personal dessert workshop. And if you try fun variations or discover your own flavor twist, feel free to share — ChocoChefAI loves hearing your sweet creations!
Related Recipes You’ll Love
If you enjoyed making this mug brownie recipe, why stop there? There’s a whole world of quick, chocolatey, and indulgent desserts waiting for you. These related recipes are perfect for experimenting, sharing, or keeping your late-night sweet tooth fully satisfied.
Microwave Chocolate Lava Cake
- Soft, molten, and ultra-rich.
- Ready in under 5 minutes — similar convenience to your mug brownie.
- Perfect for a dramatic, gooey dessert without baking a full cake.
Chocolate Peanut Butter Mug Cake
- Combines creamy peanut butter with rich chocolate.
- A quick, satisfying flavor upgrade to the standard mug brownie.
- Great for those who enjoy experimenting with add-ins like nuts or caramel.
Healthy Banana Mug Muffin
- Sweetened naturally with banana and lightly spiced.
- A lighter option for breakfast or snack time.
- Ideal for those who want a chocolate hint without full indulgence.
Mini Microwave Cheesecake
- Creamy, decadent, and portion-controlled.
- Can be flavored with cocoa or chocolate chips for a brownie-meets-cheesecake vibe.
- Perfect for special occasions or a cozy solo treat.
Exploring these recipes not only expands your dessert repertoire but also makes microwave desserts feel endlessly versatile. From fudgy brownies to quick muffins and gooey cakes, you’ll always have a sweet solution at your fingertips.
FAQs About Mug Brownie Recipes
Even a simple dessert like a mug brownie can raise questions. Here’s a handy guide to help you master your brownie in a mug recipe and avoid common pitfalls.
1. Can I make a mug brownie without an oven?
Absolutely! That’s the beauty of this recipe. Using a microwave, you can create a rich, fudgy brownie in just a few minutes — no oven required.
2. How long should I microwave my mug brownie?
Microwave times vary depending on power, but generally:
High power: 60–90 seconds
Medium power: 90–120 seconds
Keep an eye on it — the brownie should be set on the edges but slightly soft in the center for a fudgy texture.
3. Can I use dark chocolate instead of milk chocolate?
Yes! Using dark chocolate or baking chocolate will intensify the flavor and reduce sweetness. Adjust sugar slightly if needed to balance bitterness.
4. Is it possible to make a healthier mug brownie?
Definitely. Try:
Swapping out the sugar for a natural sweetener such as honey or maple syrup.
Using unsweetened applesauce or Greek yogurt to replace part of the butter.
Adding whole grain flour or oat flour for extra fiber.
5. Can I prepare a mug brownie in advance?
Mug brownies are best eaten fresh and warm, but you can:
Prepare the dry mix ahead of time and store it in a small airtight container.
Microwave only when ready to enjoy for maximum flavor and texture.
6. Can I make a larger portion in one mug?
Yes, but:
Overcooking in the microwave.
Using a very small mug, which causes uneven cooking.
Mixing too vigorously, which can make the batter dense.
7. Can I use a different mug material?
Microwave-safe ceramic or glass mugs work best.
Avoid metal or non-microwave-safe materials, as they are unsafe and may alter cooking.
8. How do I prevent my mug brownie from sticking?
Lightly grease your mug with butter or non-stick spray.
Consider dusting with cocoa powder to enhance flavor and reduce sticking.